|
SPACIOUS OPEN-PLAN-NESTS FOR BUDGIES / PARAKEETS*******************************************************************************
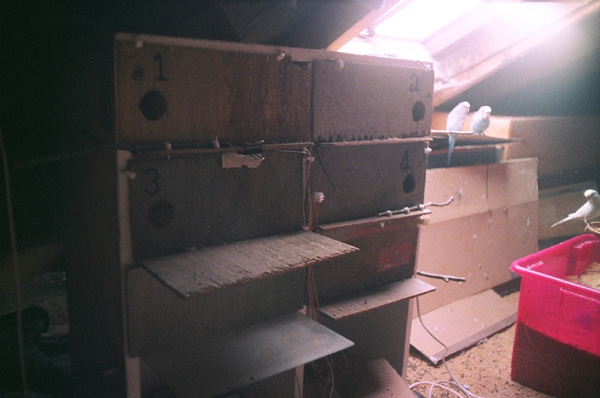
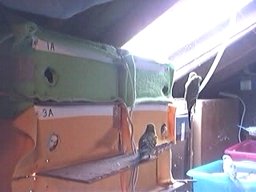
These four nests were built in an old cabinet about 26 inches wide.
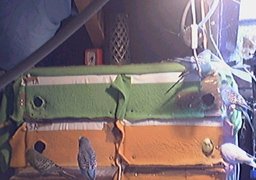
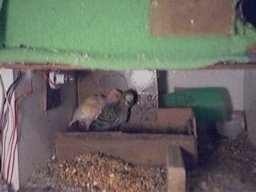
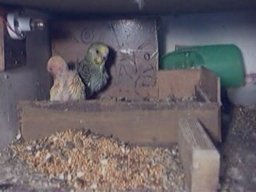
THE TOP RIGHT NEST This was the first nest I made and included a water supply. It consisted of a piece of scrap plywood about a foot square to which a plank of wood was attached for the bed. Over this was fitted a strip of plywood the same size as the bed with a large hole cut out to serve as the concave. Two plywood walls were fitted such that when the bed was placed at the front of the board, the cabinet provided the remaining two. The height of the walls are high enough to allow the hen to come and go but not the chicks. Once reaching a certain age, the chicks will climb over the wall and spend some time away from the rest of the clutch. They will return for feeding or the hen will feed them where they are. 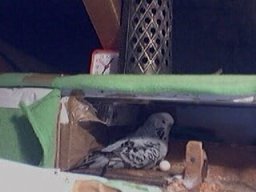
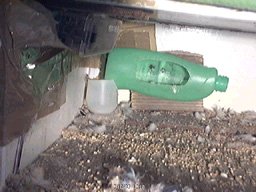
The water trough is made from a simple plastic hair conditioning bottle with a "square" hole cut out of the side. A tube leads from the top of the bottle to a funnel or water dispenser fixed above the cabinet. The water flows from a hole in the bottom of the bottle to the input of the nest below. From there it flows through tubes to a drain. LIGHTING: Under these conditions supplementary interior lighting of the nests is necessary to prevent a possible visual defect called amblyopia from developing. What the threshold illumination to prevent this condition is, I do not know. However the illumination from these lamps which are scrapped from a car is sufficient to prevent the condition. 5 Watt bulbs are adequate for all the nests THESE LIGHTING SYSTEMS MUST BE FITTED BY PERSONS WITH KNOWLEDGE AND EXPERIENCE OF ELECTRICS. MANAGEMENT: The lamps can be operated from a variable voltage 5 AMP STABILIZED DC POWER SUPPLY. Prior to laying and during the incubation phase, the voltage was set to the lowest setting about 3 VOLTS. This caused the lamps to glow very slightly. When the hen had accepted the nest and laid eggs, the voltage was increased to the next setting 4.5 VOLTS for about 5 minutes and then returned to the lowest setting. This was repeated for 3 days after which the setting was increased to 6 VOLTS and then returned to the lowest setting. By this means the hen became accustomed to the lamp and didn't flee the nest in fright. Seven days after the first chick had hatched I set the power supply to 9 VOLTS and connected it to a 24 hour segment timer. This was set to switch the lamp on for a quarter of an hour in each hour from 9 am to 3 pm. FLAWS: This nest was a prototype nest and had major flaws 1. The interior lamp is in the wrong position. A better position is away from the bed near the water trough. 2. The wiring to the lamp is not sufficiently protected, leaving it vulnerable to attack from the hen. 3. There is no step on the far side of the bed (not shown). It will therefore be more difficult to return to the bed than to leave. A sunken bed is preferable but is more difficult to construct. 4. Giving the bed all it's own walls has advantages particularly on inspection of the nest. Despite these shortcomings, the nest was accepted by two hens.
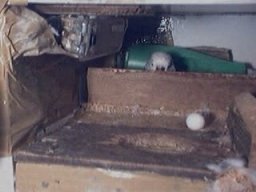
THE BOTTOM RIGHT NEST The nest below is similar with the bed behind the front wall. This is the preferred position as the clutch is not directly visible from outside the nest.
This is a better nest as the extension area for the chicks is much smaller and on the same level as the bed.
This nest was accepted by 2 hens with one refusing to lay on the bed. This was almost certainly due to the proximity of the lamp to the bed.
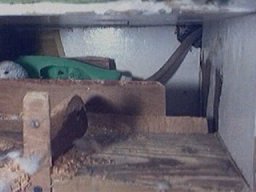
THE TOP LEFT NEST This nest wasn't popular - very likely due to the bed facing the entrance. It may have worked well with the bed on the right hand side with the chick area facing the front but wasn't tried. In this position the lamp will need to be fitted at the back away from the chicks. The front wall protecting the bed needs to be higher and a long step in front of the bed fitted. The floodlight tube on the left wall was was intended to function as an interior heater but was abandoned in favour of an underfloor system.
THE BOTTOM LEFT NEST This nest went through many successful phases. I initially tried it with a circular cutout in a rubber sheet to serve as a concave. Later when the chicks were about a couple of weeks old I fitted a small cardboard box for them. At this stage I didn't know if the chicks would go into the box and if they did would the hen recognize them as her own and feed them. Of course she did and naturally she eyed it up as a nursery compartment for herself. Despite covering the box with packing tape to strengthen it she succeeded in demolishing it! This was not out of spite or temper - all hens attempt to destroy a nest before accepting it for security reasons.
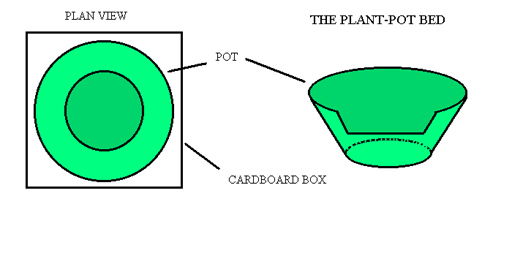
On her second clutch I provided her with a bed which consisted of a small plastic plant pot fitted in a cardboard box and taped to the floor. The rim of the pot had a cutout in it to give her easy access and the inside scoured to provide better grip.
DIMENSIONS OF THE CHICKS BEDROOM (EXTERIOR) 164mm LONG, 145mm WIDE, 74mm HIGH
THE CABINET UNDER CONSTRUCTION
THE ELECTRICAL COMPARTMENT AT THE FLOOR WITH THE HEATING COMPARTMENTS ABOVE
|