|
THE BUDGIE HOUSE********************************************************************************************* (THE OBSERVATION NEST)
HOME
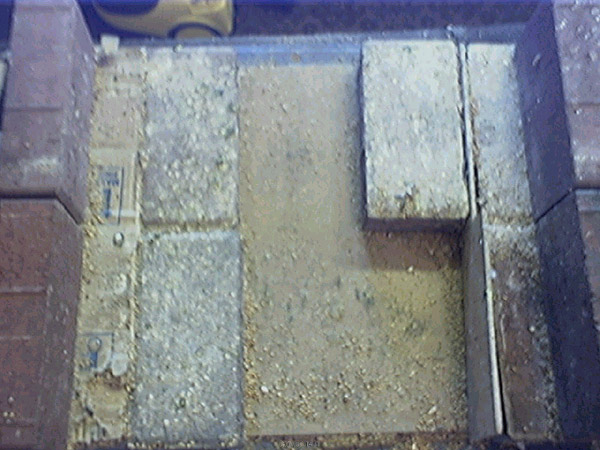
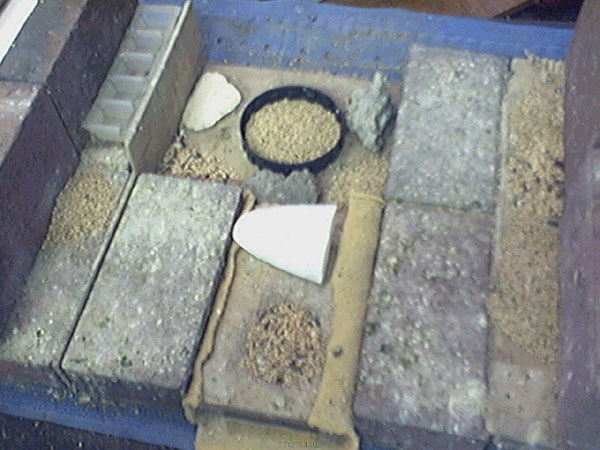
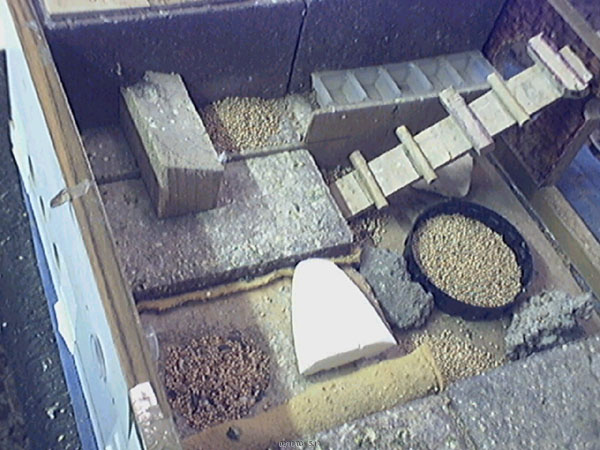
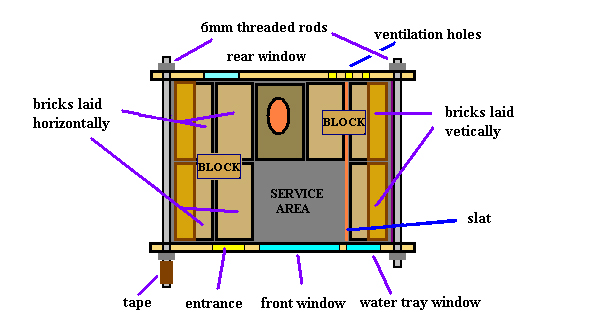
This is a substantial structure using bricks and wood and needs to be built on a sturdy table and preferably in the place where it will be used. The house was built from available materials and has three stories making two nests - a large single storey observation nest at the bottom and two upper stories comprising the second nest. An internal water tray is also provided for the convenience of the hens. This was also used extensively by the older chicks before flying the nest. It's fairly easy to construct requiring only moderate DIY skills. . THE OBSERVATION NEST This part of the house has an open plan design with a large interior area and can double up as a hospital with very little modification. However this will require the services of someone with knowledge and experience in electrics. The structure is built on three foundation layers consisting of thermal fleece, a bathroom mat (PVC) and hardboard. These provide insulation and inhibit heat loss through the floor. The house was built without any fixings and proved very stable. This was helped by cardboard shims fitted between the wall and base bricks and the weight of the other floors. However it is recommended that longer front and back panels be used to enable the nest to be clamped with threaded rods and the bricks cemented. The left rod can then be used as a perch which will be used in conjunction with an extra brick placed in front of the entrance. Tape a few layers of insulation tape around the end of the rod to make it softer. Eleven British paving bricks were used with dimensions 5cm - 10cm - 20cm. ARRANGEMENT OF BRICKS Start with the bed or concave and arrange the bricks around it. It fits in the space at the back. Make sure they are as tight as possible. Cardboard strips (shims) are fitted between the vertical walls and the horizontal base bricks.
The large area at the front is the SERVICE AREA where feed is provided. Also cuttlefish bones and “edible rocks” are put there.
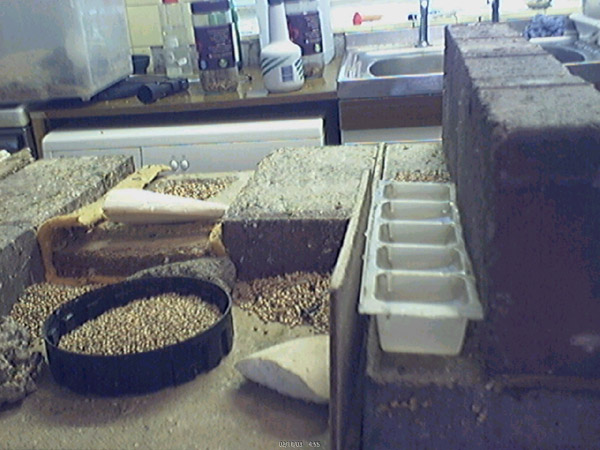
A small plywood slat is inserted between a couple of the bricks at the back to retain the water trough which is made from an ice cube tray.
PLYWOOD WATER TRAY RETAINER
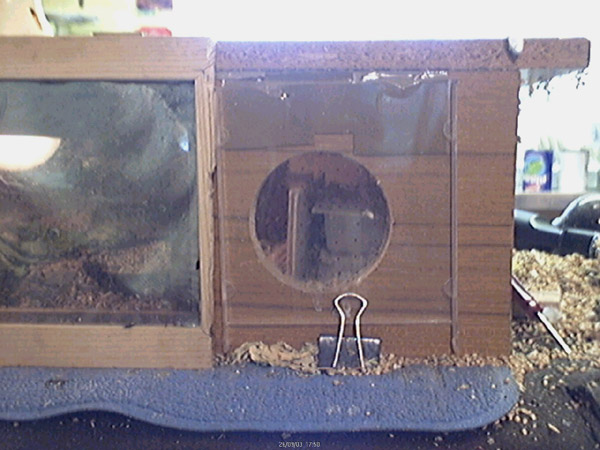
The tray can be serviced through a window in the front panel which is made from one half of a dotted CD case. The case is simply taped to the top of the front panel.
ACCESS TO WATER TRAY
One leg of a paper clip is wedged beneath the unit to keep the window closed. This particular one gave enough spring tension and enabled the window to be opened easily.
VIEW FROM THE REAR
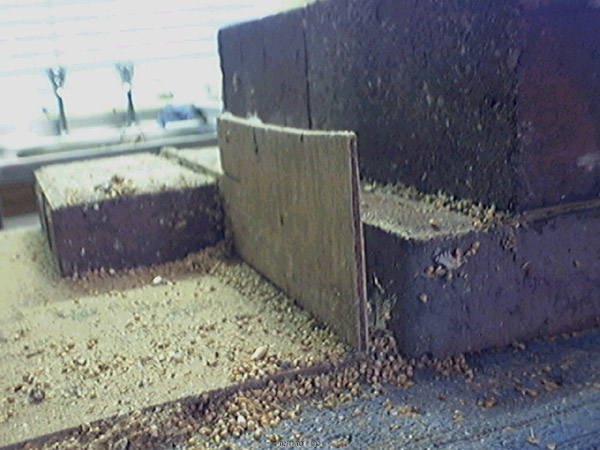
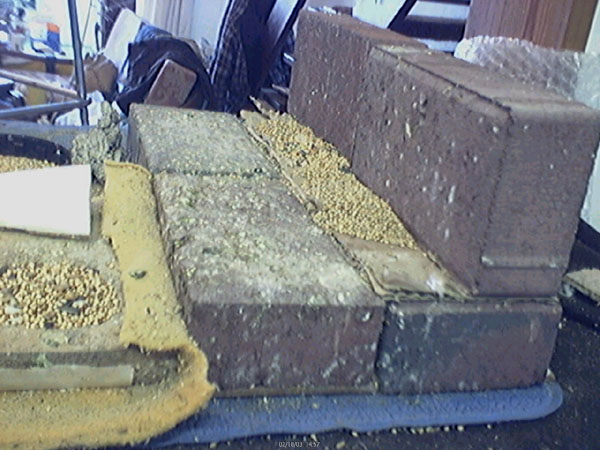
The bed at the back has thermal fleece below it for added insulation, however there are safety issues regarding this material and this can be replaced with a thin slab of expanded polystyrene Once the bricks are laid out as in the images the front and back panels can be fitted. Make sure that the bricks are orientated the same way (they have small ridges on the edges).
FRONT AND BACK PANEL FITTED
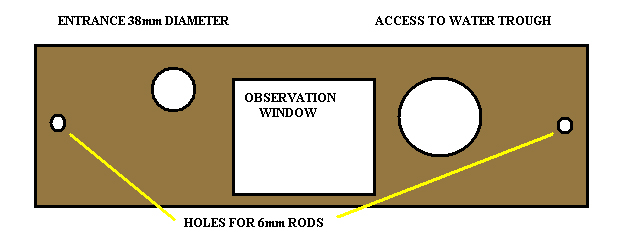
______________________________________________________________________ PANEL CUT-OUTS (NOT TO SCALE) FRONT PANEL
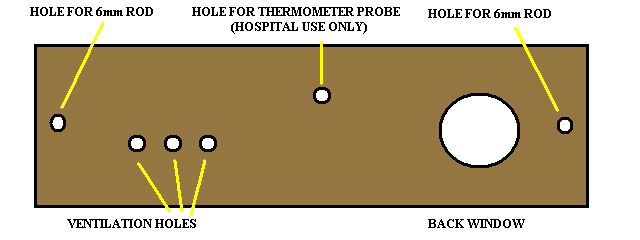
BACK PANEL
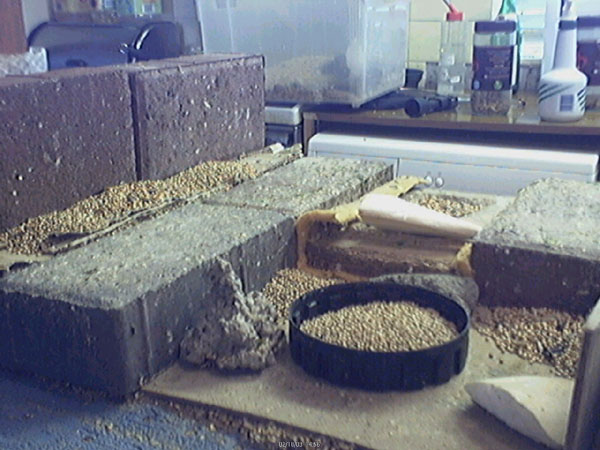
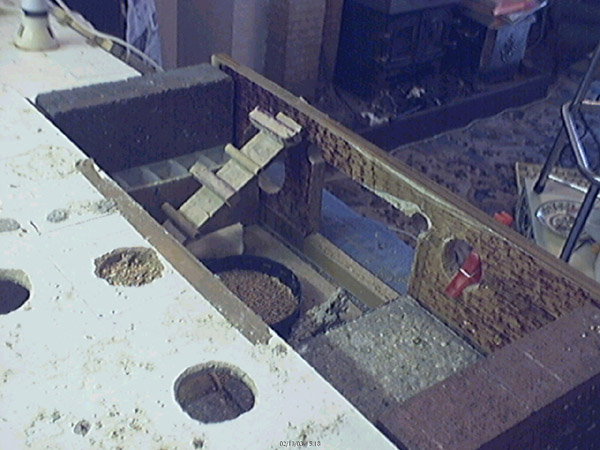
Use a rats’ tail file to smooth the edges of the entrance to enable the birds to come and go without snagging their feathers. The nest was not fitted with a perch as such but a landing brick was placed in front of the entrance which worked okay. This brick will still be needed when the threaded rod is used as a perch.
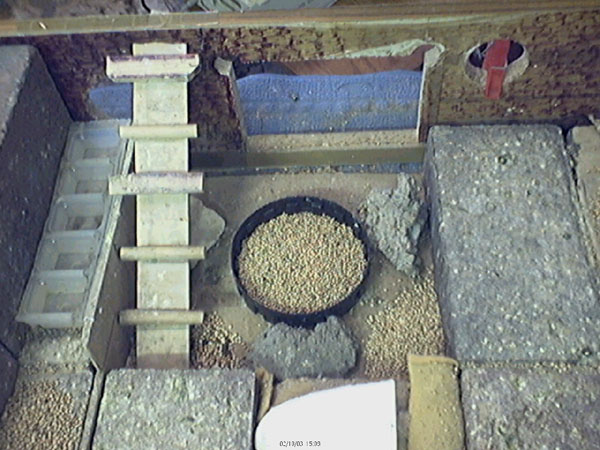
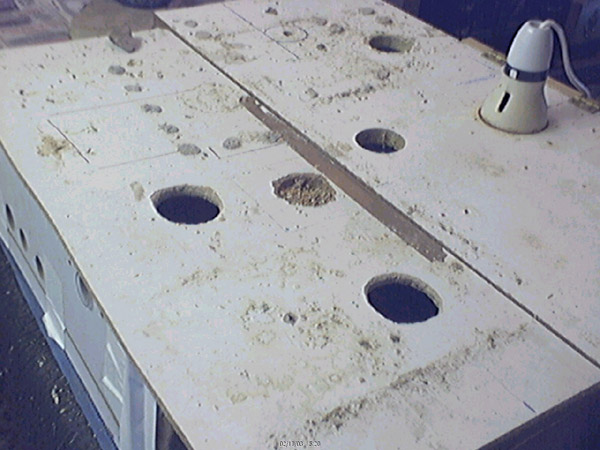
The ladder is not part of the nest. The wooden block creates a retreat for the chicks that will venture away from the bed after a time. This is an important feature of the nest and enables them to have their own space if they need it. It also helps to develop their visuo-spatial abilities and allows the hen to concentrate on the younger chicks. It is simply stuck down with “Blue Tack“. Rotating back and forth whilst pressing down ensures a good grip. A second block is provided on the opposite side in the form as a stair to the upper floors. This can be substituted by a similar block if these are not to be built. The roof consists of two sheets of laminated chipboard which were held in place by the upper floors. I recommend using two equal lengths hinged to the ends of the front and back panels. If the upper floors are not to be built the holes will not be required. The lamp-holder is only necessary for remote monitoring or if the unit is to be used as a hospital. A holder with an H.O. skirt is used and is stuck down with wood glue. Both the holder and wood are first sandpapered to give a better key.
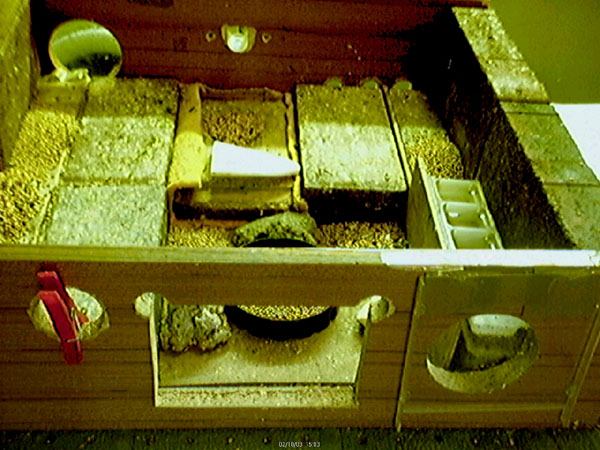
FRONT ROOF PANEL REMOVED
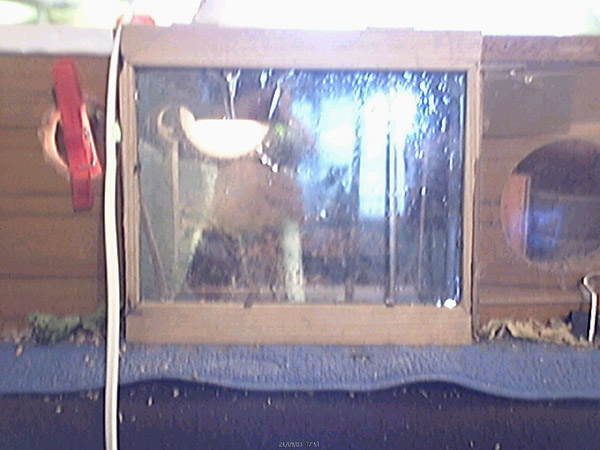
FRONT OBSERVATION WINDOW
The observation window is made from a small picture frame and is attached to the front edge of the front roof panel by two small hinges. No retaining catches were necessary as the mat provided enough friction to hold the window closed. The sides of this particular frame had to be cut down to fit into the available space. A grid of small spots is applied to the window with a felt tip pen to make it visible to the birds. The two way film is not necessary and was fitted for testing purposes.
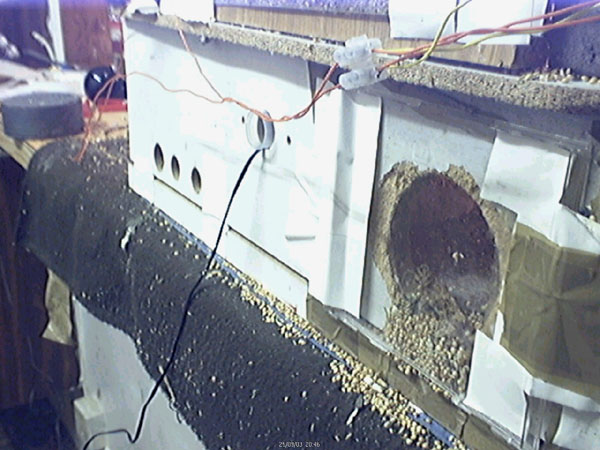
REAR OBSERVATION WINDOW
This is an emergency window for access to the back of the nest and is not to be used for general servicing. It can be constructed in the same way as the water tray window at the front. The board on the roof is part of the second floor. The wires are not required for this nest.
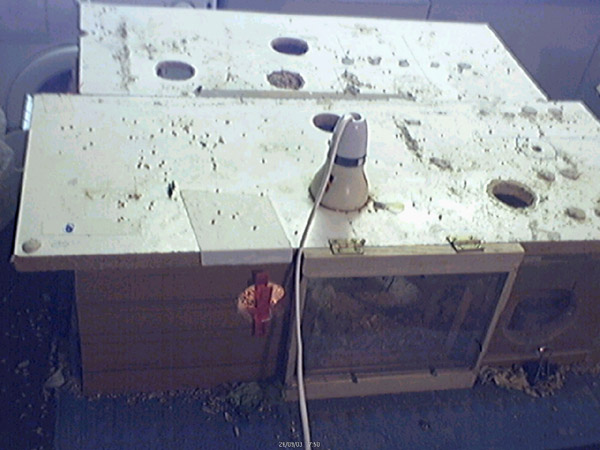
THE COMPLETED NEST
When completed check for gaps and fill with sawdust if necessary. Check for sharp objects especially around the water tray and retaining slat. Make sure that the windows cannot be pushed open from inside.
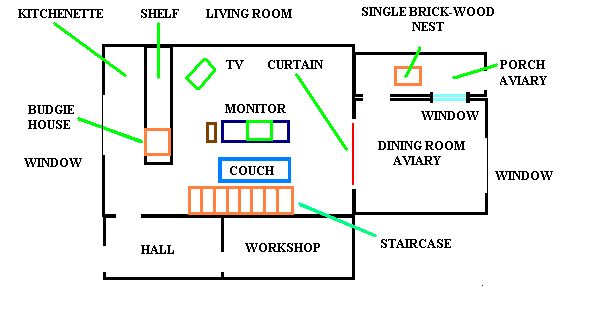
PLAN OF BUDGIE HOUSE
PLAN OF KEEPERS' DOMICILE
OPERATION - IN THE AVIARY The nest will have to be monitored remotely by camera and the interior lamp fitted. The camera must have a CCD sensor because of their high sensitivity. Most tend to use CMOS sensors which are cheaper but require much more light for a good image. The nest uses a mains voltage 15 Watt pigmy lamp (sometimes called a sign lamp) for illumination controlled by a dimmer switch. This is too bright for the birds on full and the dimmer should be set to half way. This gave more than sufficient illumination for the web cam which was a Logitech 3000 CCD camera. Energy saving lamps are not suitable. Staple a cloth around the observation window and drape it over the camera. This will screen the window from unwanted reflections and also prevent the nesting pair from being visible to the rest of the flock. The camera should be fitted to a bracket fixed to the nest about an inch in front of the window. Should the nest not be taken in a reasonable time it may be because of its unusual appearance or because of its position is too low. The solution is to tie a line from the nest to where the birds normally gather. Sooner or later they will fly on the line and venture down to check the nest. I suggest fitting a large eye ring to the left of the entrance. Use a timer to switch the lamp on and off according to the LIGHT TABLE. Set the dimmer to VERY low - just a glow: Too high and the hen may reject the nest. Seven days after the first chick hatches increase the illumination somewhat - enough to give a reasonable picture on a CCD camera. Do this while she’s away from the nest. Watch as she returns - more than likely she’ll hesitate at the entrance before going inside. If she flies away startled abandon the brighter setting and return the illumination to the original glow. The camera should still give an indication of the activities inside albeit with a fair amount of grain. If all goes well the illumination can be increased in increments later on to a maximum of seven Watts. It’s advisable to commission the nest when other hens are brooding or rearing chicks. This will enable her chicks to be fostered out in the unlikely event that she abandons the nest.
OPERATION - IN THE KEEPERS QUARTERS FOR STUDY Direct monitoring of the nesting pair can be successful in a quiet and controlled household. Birds can be startled or get upset by unfamiliar sounds from a radio/TV etc. especially the sound of gunfire - westerns, war films or films of a violent nature have to be forsaken unless headphones are used. The same applies to entertainment shows. Audience applause (clapping) confuses and disturbs many birds. On the other hand many budgies find the sound of music played softly enjoyable - particularly pop music! Some will tweet along to the music. As with most things, expose your birds to new experiences in moderation! - And monitor their responses. A bird preening or stretching is a relaxed bird. An agitated or very still bird is a frightened bird.
First of all denude your space of as many perching places as possible (pictures frames are a special favourite) and place a small tree or branch as close to the nest entrance as possible. This should considerable increase the birds’ chances of locating the nest. When the cock can repeatedly locate the nest fit another perch for him in the corner of the room. Later fit another substantial tree or set of perches on a far wall for the whole brood to use. This will be their home before being returned to the aviary. Remove all ornaments and unnecessary loose objects. Observe all the safety prerequisites as detailed in BREEDING BUDGIES INDOORS. Choose a bonded pair that know you very well and are ready to reproduce. Allow a day or so for the birds to become familiar with the new environment. During this time the hen will look around for a suitable place to lay her eggs. If she fails to locate the nest herself after a couple of days she must be brought to the nest. Spray her down and introduce her gently into the entrance hole. She will check first of all that it’s safe so don’t force her. When she goes inside she will very likely be agitated and try to get out. This is more likely to happen if the bird is netted. Peg the door and let her settle down. If she wants to take the nest she will after a short while go to the bed and begin to prepare it. This involves gnawing at it to shape it to her preference. This is not likely to happen immediately. If after an hour it seems like she’s not going to settle then let her out to return to her mate and try again the next day. This time introduce the mate after say half an hour. This may need to be repeated for some days. Some hens will never accept a nest away from the flock and if this is the case try another pair if a suitable pair is available. The key to success is patience! This can be very rewarding. Every bird is individual. The most important thing of all is that the birds feel comfortable in the new setting. Some hens are very happy to be away from the flock and the regular bother from other birds near the nest. Once it becomes clear that the pair want to use the nest they will need to locate it themselves. This involves catching the birds as before and putting them in the nest, (the hen first followed by the cock). Slowly take them to the nest to enable them to “clock” the surroundings on the way. Immediately peg the entrance and open up again after an hour to let them out. Repeat this procedure four times. The next day concentrate on the hen - the cock will then be able to locate her by her calls. Monitor for nesting behaviour - mutual preening, cock feeding mate etc. If either bird squawks then clearly the pair is not suitable. The hen should begin to prepare it each day and finally roost in the nest. She will lay her first egg the next day. Once a hen has taken the nest, she and her mate should be allowed to get on with the job of rearing their chicks with the minimum of interference from the keeper. Too much needless disturbance will cause her to abandon her eggs and or chicks. Change the water once or twice a day depending on need and maintain the seed tray. Lettuce can be given twice a week which is very popular. The chicks should fly the nest on alternate days as is usual but the last one may fly early not wanting to be on its own. It’ll be more vulnerable and may not be able to fly properly so a special watch on it is necessary. The cock will take over the feeding if he has not done already and no intervention is necessary unless something goes wrong. The youngsters can be moved into the aviary after six weeks. Observe the “Over-night stay in the cage” rule before releasing them. On No account lock a pair in permanently as a kind of cage breeding nest - it’s not big enough DOWNSIDE: After the third eggs is laid, the hen concentrates on her eggs more with the result that the cock sometimes feels left out. With a large flock it is highly likely that he will have buddies in the aviary and will often call to them a lot - especially if he is in earshot of them! Bringing another bonded pair to be nested in the nest above can help. This requires the upper two stories of THE BUDGIE HOUSE to be built beforehand.
FOR OBSERVATION Unexplained chick losses, chicks showing injuries, eggs going missing, eggs being destroyed, addled or dead-in-shell chicks or unexplained injuries to either pair: CHICK LOSSES OR INJURED: For unexplained chick losses or injuries, bring the hen and remaining chicks from the aviary and into the nest for observation. PREPARE YOURSELF TO HAND REAR THE CHICKS. Bring the chicks first followed by the hen immediately after. If wet she may not attend to the chicks immediately but should do so within the hour. If not introduce the mate. If the hen continually squawks or if after an hour neither bird has tended to the chicks then let the pair out and try again an hour later. Meanwhile hand feed the chicks. This time NET the birds instead of spraying. If after a further hour the chicks haven’t been fed or tended to then foster them out to another hen and put the parents in separate non breeding zones. It may be the case that the cock will feed his offspring with the hen just looking on. This is not a safe situation - it’s very unlikely that he‘ll completely take over the hens’ job of rearing the chicks. This is rare so monitor till nightfall and if the chicks are well fed leave ‘till the morning. Put the hen in the COMPOUND and foster the chicks out if it’s clear that she has abandoned the chicks: Return the cock to the aviary. With older chicks (over three weeks old) more lea-way can be given as they don’t need to be fed so often. The main indication is the strength of the hens’ bonding to her chicks. If she tends to her chicks but does not feed them straight away then let the cock out and give her more time. Until the birds can confidently locate the nest, peg the entrance in the evening and blank the window and open up in the morning. These provisions should only be undertaken when the keeper has experience of hand rearing chicks or when a reliable foster hen is available. Otherwise leave things be and increase remote monitoring of the nest. EGGS GOING MISSING OR DESTROYED, ADDLED OR DEAD-IN-SHELL CHICKS
Concentrate an aviary camera on the nest and increase remote monitoring. Allow the hen to incubate to term (19 days after the last egg was laid). If no eggs hatch, give the pair a resting period then let them start afresh in the observation nest. INJURIES TO EITHER PAIR: This frequently happens to cocks by other cocks vying for the hen. If the bird fails to deal with the suitors remove them to the COMPOUND for the duration of the hens’ nesting. In the case of an attack on a nesting hen by a contesting hen confine the attacker to the COMPOUND for a period of eight months. In the case of a suspected “domestic” injury where no external cause is apparent, re-nest the pair in the observation nest. In all cases foster out (or use an incubator) fertilized eggs but bring the clear ones.
HISTORY: The first pair to be introduced took to the nest instantly. There was no problem with the birds which were moved for study. The four chicks (ten to sixteen days old) had shortly beforehand been moved into the nest. Prior to this they were nesting in a SINGLE BRICK-WOOD NEST in an adjoining porch to the house. The hen showed no sign of panic and fed her chicks 95 minutes later. (She may well have fed them earlier - I was busy in the porch for a while). She was not a young hen and ten days training as outlined above was necessary before she could confidently locate the nest. This may have been due to her age or poor vision or a combination of both. Also being the first she had no clues from the other birds as to its location and there was no perch in the vicinity of the nest. The cock located the nest in two days helped undoubtedly by his mates’ presence in the nest. Ten days later two “at risk” chicks (five and seven days old) were fostered out to her. She and her mate accepted the chicks immediately and cared for them as their own. Two days later one of her offspring (seventeen to nineteen days old) fed them. Later, the two younger siblings looked after the orphans a lot of the time. Initially one of these (The Frostie Babe) rejected the newcomers by kicking them off the bed! She was very close to her father and probably resented them competing for his affections. I removed the chick to me for an hour and then put her back after which she cared for them. The entire clutch developed normally and was being fed by the cock well before flying the nest. Four days after all the chicks had flown the nest she returned without prompt to start another clutch. She and her mate raised two clutches of four chicks plus the two orphans before being returned to the aviary. One chick died from the second clutch from an unknown cause the day after flying the nest. This is not an exhaustive account. FLAWS: This nest proved very safe despite the service area being at a lower level than the bed and bricks. No young chicks wandered into this part and if the bed is no more than say half an inch thick (13mm) then there should be no issues regarding this. During the last week before flying the nest most nestlings fed (or practiced) in this area.
THE LIGHT TABLE ON OFF 09:00 09:15 10:00 10:15 11:00 11:15 12:00 12:15 13:00 13:15 BREAK 15:00 15:15 16:00 16:15 17:00 17:15 18:00 18:15 The lamp must on NO account be kept on permanently. The hen when rearing her young is working day AND night! She snatches precious sleep when she can even during the day.
|